Sales
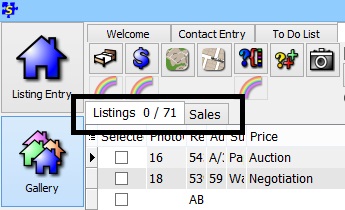
In SalesPartner, the gallery has two tabs: Listings, and Sales. Listings with status: 'Sold' show in the Listings tab when you click on the lower menu 'Sold' button. Sales records are created and linked to Sold Listing records when you change a listing's status to 'Sold' and complete the required fields (Date, Price, Sold By).
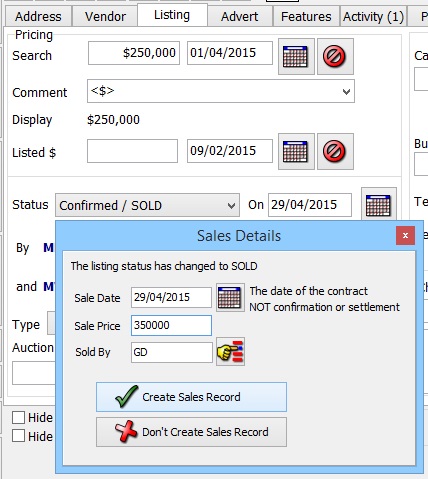
When an available listing's status is changed to 'Sold', SalesPartner will prompt you to enter sale details so that the 'Sale' record can be created.
Sale Price and Sold By details are required to enable the 'Create Sales Record' button. You can proceed without entering these details if you do not require a Sale Record, however we encourage you to enter sale details where possible. Note: when you process a sale in OfficePartner, the Sale record in SalesPartner will be automatically created.
It is not unusual to have Sale Records which are not linked to a Listing. This often happens when sales are imported from REINZ.
You may also end up with 'Sold' listings which are not linked to a Sale Record. This occurs when A) Sale details are not entered, and B) when a listing's status is changed to 'Sold' via Gallery, Tools, Change Status.
In the Listing Entry screen, there are two ways to determine whether you have a Sale Record for a listing. Firstly, the sale price is displayed in the listing thumbnail. Secondly, the 'Show Sale' button is enabled.
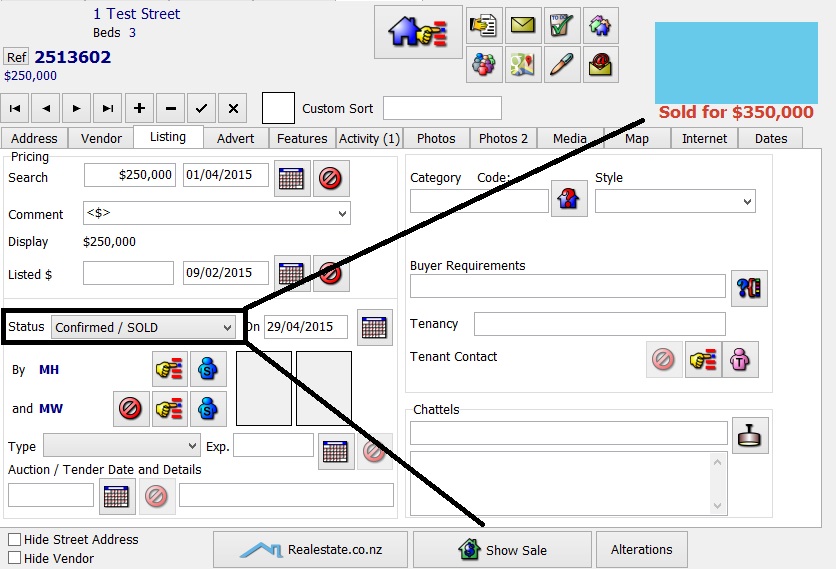
In reverse, you can determine whether a Listing record is linked to a Sale record by double clicking into a Sale and checking the Listing icon. When the listing icon is unavailable, it means that the sale record is not linked to a listing.
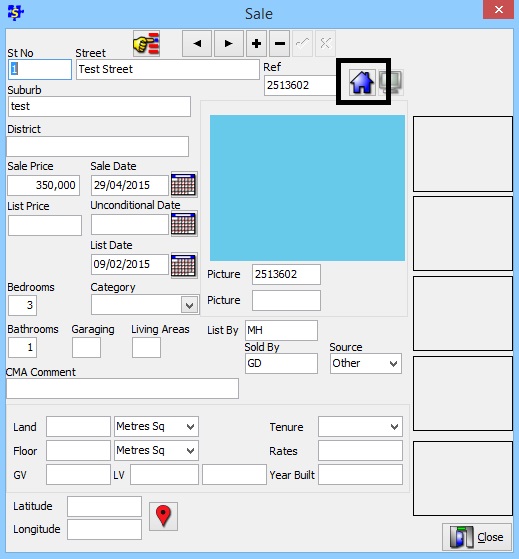
Tip: To link an existing sale record to a Listing, enter the listing's reference into the Sale reference field*, and tick to save. *If photos are present, they may not appear immediately but you can toggle back and forth between listings to force the screen to refresh using the navigation arrows.
You can use the Reference field to link an REINZ Sale Record to a foreign listing (which you may have entered manually or downloaded from Trade Me or Realestate.co.nz). Linking a Sale Record to a Listing (which includes photos) will enhance CMA reports by including property images where available.
When an Office (which is an REINZ member, and in which synchronized agents are REINZ members) downloads REINZ sales data into SalesPartner (and agents subsequently synchronize the sale data), you need to be aware of issues that may arise.
Duplicate sale records may occur when the office has processed a sale in SalesPartner, and that sale has also been downloaded from REINZ. In this situation, it is the REINZ sale record which should be deleted (identifiable from the sale reference which is 'REINZ' by default for REINZ sourced sale records).
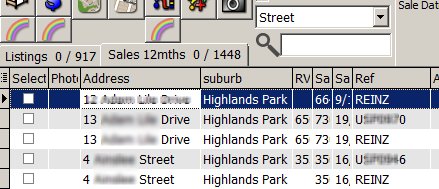
In this example, the REINZ sale records of the duplicate listings should be deleted. Tip: Use Street order to quickly identify duplicate sale records.
Discrepancies
When a salesperson has synchronized Listings but has different sale records to the office, you can follow these steps to fix (audit) discrepancies.
Method 1 (Preferred)
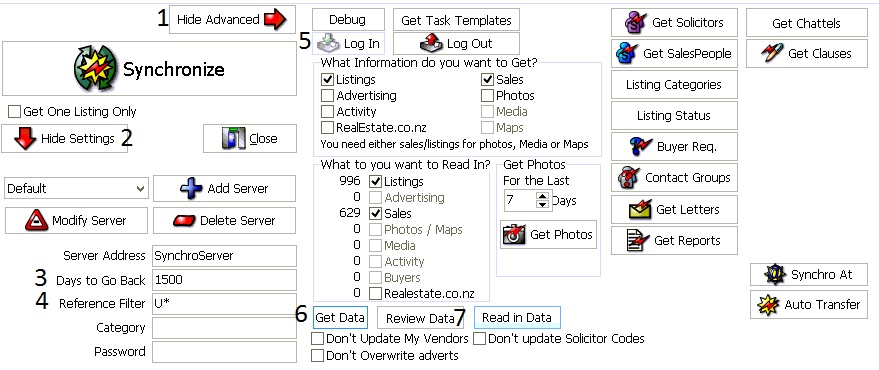
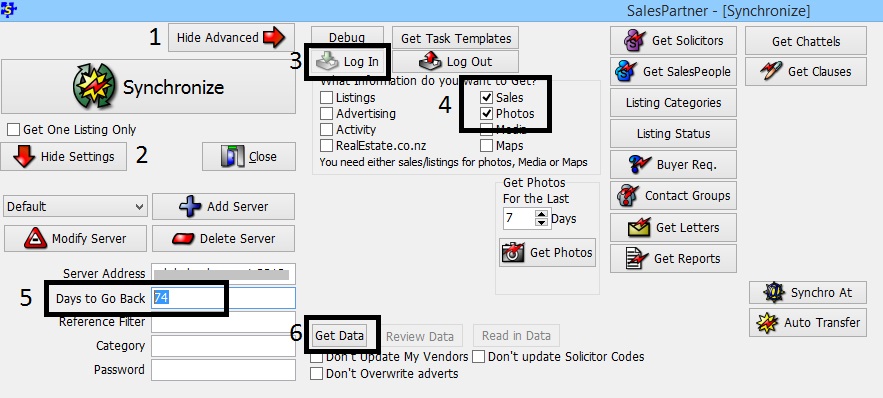
On the Agent's PC, open SalesPartner -> More -> Synchronize
1 & 2. Click Advanced & Settings to expand Synchronization options
3. In Settings, specify days to go back: 1500 (to audit 1500 days worth of data)
4. In Settings, Reference Filter: (optional) enter a reference so that you only fetch office data eg: U* to fetch all data for listings which start with 'U'.
5. Click Log in and only select Listings and Sales in your check box options.
6. Click Get Data (may take a minute or two to complete)
7. Click Read In Data (may take several minutes to complete)
Method 2
On the Agent's PC, Create a backup then Open the Gallery on the agent's PC and click into the Sales tab.
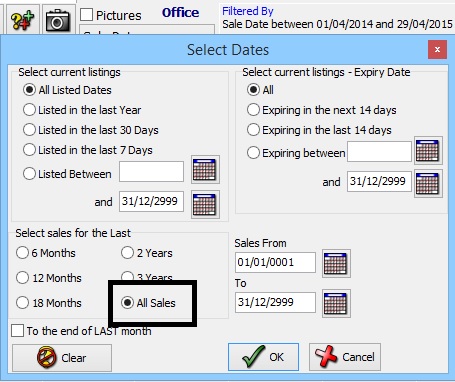
Use the Other Selections filter to display all sales. Click Other Selections, Click Listed Expiry & Sale Date Ranges, Select All Sales, Click OK.
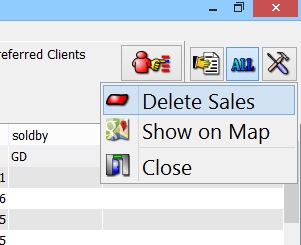
You can select ALL then open Tools and Delete Sales.
Now you are ready to re-sync Sales from the server to the agents PC.
Click More
Click Synchronize
Click Synchronize
1. Click Advanced
2. Click Show Settings
3. Click Log In
4. Select Sales, & Photos
5. Enter Days to Go Back. To go back one year enter '365'
6. Click Get Data
2. Click Show Settings
3. Click Log In
4. Select Sales, & Photos
5. Enter Days to Go Back. To go back one year enter '365'
6. Click Get Data
Click Read in Data
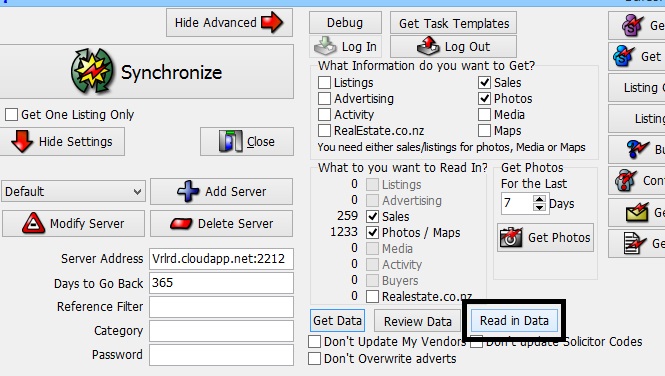
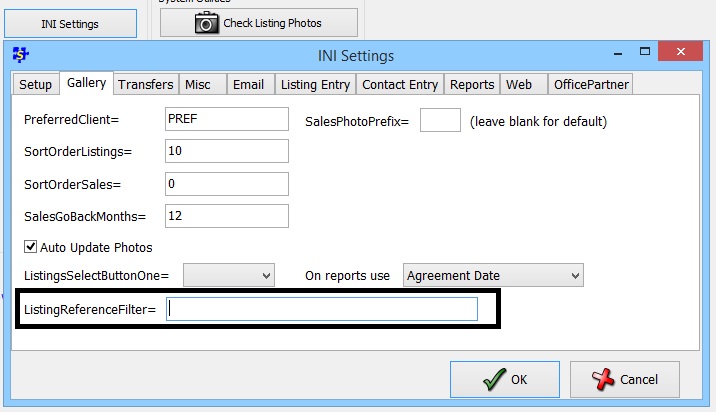
Upon completion your synchronized sales (ased on how many days you went back) will mirror what is shown in the office copy. Note: Gallery reference filter default differences may exist see: Settings -> INI Settings -> Gallery Tab -> ListingReferenceFilter