Occasionally when uploading to Trade Me via API you might see an error which says "Upload failed, Trade Me has not indicated what went wrong." This error is usually caused by special characters which may be present in the listing advert body and/or heading. A common way this can happen is when an agent sends the administrator an advert as a MS Word document. The administrator then copies and pastes the text into SalesPartner, which may include hidden special formatting characters contained in the original document. To clean the text and resolve the error, you can use http://www.textcleanr.com/ Click Listing Entry > Advert tab, select the advert text (Ctrl+A), right click & Copy (Ctrl+C). 
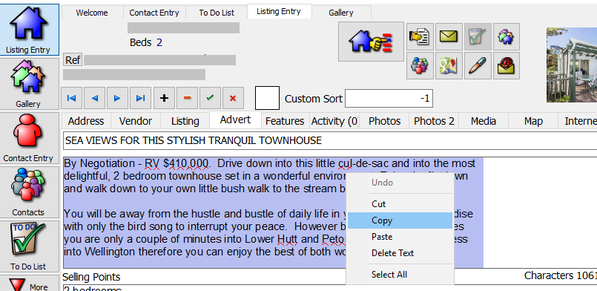
Right click & Paste (Ctrl+V) the advert text into the TextCleaner window. Drop down MS Word Specific Characters and select Replace Them. Now click Clean Text, then copy and paste the cleaned advert text back into SalesPartner, and re-upload the listing to Trade Me.
0 Comments
Today version 12.0.0.12 has been shifted from the beta update branch, to public release. Update highlights: - Support for multiple REAXML feeds including Neighbourly.co.nz and Hougarden.com - Enhanced Activity note options which include synchronization support. - Global Gallery Filtering via INI settings. - New To-Do List column options: Day of the Week, Listing Reference, and BigDescription (extended notes). - Supports completing multiple SmartLetters via To-Do List. - Improved encoding for resilient advert handling on Trade Me API, and REAXML uploads. - Supports uploading YouTube videos to Trade Me (via API) as well as Realestate.co.nz. Plus numerous bug fixes and enhancements.
If you're running Windows 10 Pro, you can access your computer remotely - including from a mobile device via Microsoft Remote Desktop apps. Press Windows+X > System to check which version of Windows is installed on your PC. Step 1. Configure Remote Desktop Open Control Panel > All Control Panel Items > System > Remote Settings > Remote tab. Under Remote Desktop, - Select Allow remote connections to this computer. - Tick Allow connections from computers running Remote Desktop with Network Level Authentication (recommended). In Select Users... verify the user account which can log into the computer using Remote Desktop Connection. If you want to add another user, they will need to be added as a user in Settings > Accounts. Click Apply > OK. At this point you can remotely connect to your PC through your Local Area Network using the PC name / IP address as the server address. Step 2. Router configuration Open Command Prompt and type ipconfig to determine your PC's IPv4 address. Log into your router as an administrator via the Default Gateway address shown in CMD. Router user interfaces vary, but you'll need to find the settings for Network Address Translation or NAT. You'll need to open and Enable port 3389 -> 3389 on TCP and UDP. There will probably be a suitable drop down menu option, otherwise you'll need to create a custom service. Enter your PC's IPv4 address as the Server IP Address or Host-name. Click Apply/Save. Step 3. Determine your public IP address Open your internet browser and enter this URL: http://checkip.dyndns.org/ This is your Server Address/URL which you will connect to from a remote location. Step 4. Try connecting remotelyFrom a remote location / external network, open the Microsoft Remote Desktop app on your iPhone/iPad, Android or Windows 10 device. Click + Add > Desktop Connect to a PC: Enter the URL you discovered in Step 3. as the PC name and click Save. Enter your Microsoft account credentials for the account which owns the PC you are attempting to connect to, and click Connect. If prompted, click Yes to trust this connection despite certificate errors. Your remote desktop connection should now be established. Troubleshooting: To check your Router / port configuration, open Powershell on a remote PC and enter this script: Test-NetConnection [YOUR PUBLIC IP ADDRESS] -port 3389 A True result indicates that your configuration is correct.
Question: How can I bring up all of my 'Z' listings in the Gallery, regardless of status? In the Gallery, you can filter listings by reference in Other Selections. For example, to filter all listings that begin with 'Z', click Add and enter Z*. Click OK > OK to continue. To expand the selection to display all Z listings regardless of status, Click Other Selections > Status > and drag all status types into the Selected List column. Click OK to continue. Now all listings that start with Z are displayed. Tip: Use the Status column to identify/sort by listing status. The Filtered By panel shows applicable filters. To revert back to the default view, click Clear Selections / Refresh.
In version 14, the SalesPartner database is migrated from the Borland Database Engine to SQL. Running SalesPartner as an SQL database opens up a world of possibilities in terms of app delivery, storage, and optimization. For example, this week we mounted a SalesPartner database on Microsoft Azure SQL. A solution like this would offer the best of both worlds at an affordable cost - potentially as low as $10NZD per month. You would reap the benefits of Cloud based data, however the application itself is run locally. In this design, internet speed is a constraint on performance. So we've identified a number of optimizations that would improve performance overall. For instance, by shedding calculations that occur during launch we've already reduced the app startup time by 70% Version 12.0.0.12 is due to be released into production on Tuesday 27/06/2017. The changes introduced in version 12 lay the groundwork to migrate databases to version 14. As we complete exhaustive testing on version 14, we'll be inviting candidates to take part in beta trials.
|
Admin
|