SalesPartner
p +6444711849
  • Home
  • News
  • Software
    • SalesPartner Cloud
    • Websites
  • Pricing
  • Downloads
  • Contact us

Troubleshooting: Open Homes on Realestate.co.nz / openhome.csv errors

28/7/2016

0 Comments

 
If you receive an openhome.csv error when you upload listings to Realestate.co.nz, you'll need to check several settings on your PC.
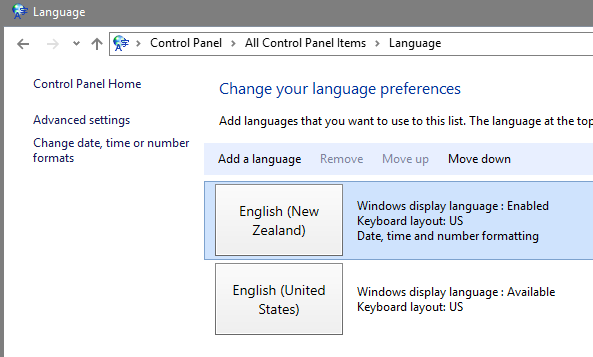
In Control Panel\All Control Panel Items\Language, the English (New Zealand) language pack should be installed and moved up into the default language position. You will need to sign in again or restart your PC to apply a newly installed language pack.
Picture
In Control Panel > Region > Location tab, Home Location should be New Zealand
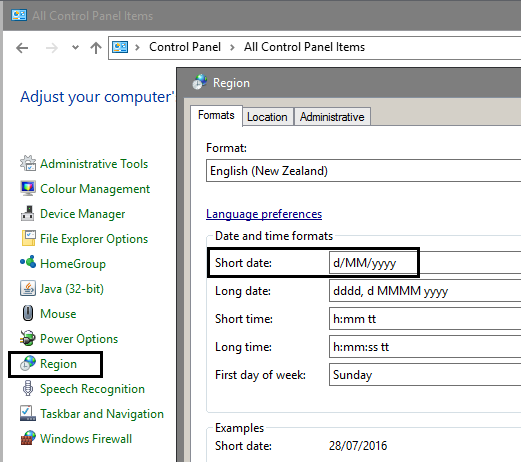
In Control Panel > Region, your Format should be English (New Zealand)
In Short date: the format should be d/MM/yyyy
Picture
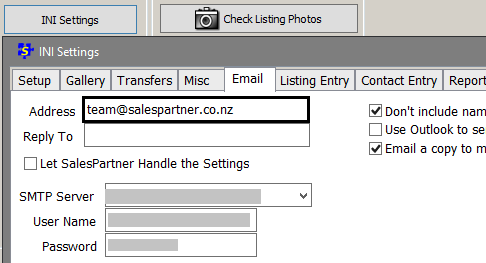
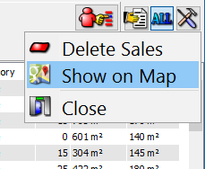
In SalesPartner > More > Settings > INI Settings > Email tab
Enter your office email address into the Address field. You'll receive openhome.csv error reports through this address.
Picture
0 Comments

Business Intelligence

26/7/2016

0 Comments

 
What kind of marketing tools are available in SalesPartner?
First let's import and analyse 36 months worth of residential sales data from your farming area.
In Gallery, open ​Tools > Show on Map ​to visualize the sales.
Picture
Notes: ​Initial Location processing can take several minutes depending on the size of the data set. As a rough guideline you should aim to select at least 500 sale records for a large suburb.
Picture
Picture
You'll often see patterns where sales occur more frequently in certain streets and areas. Your local market knowledge can shed insight into reasons why.
Picture
Clustered sales may occur in close proximity. In some cases vendor motivation may be boosted when a nearby sale achieves a result above expectations.
Picture
You can enable Satellite mode to help identify local amenities. Look for patterns of intense activity around high visibility areas such as bus routes.
Try applying a Gallery column filter like: Days on Market = less than 30, to identify sought after pockets with above average turnover.
Picture
Picture
​Takeaways:
- Use market insights to help define your target area and improve the ROI for your prospecting efforts. Instead of targeting a large area, create a defined list of streets where sales occur more frequently.
- Where you detect patterns, increase your profile in these areas and look for emerging hot spots when a recent sale achieves a record result (bidders at auction, tenders, website views).
- Check local listings for obvious potential listings such as private sales, expiring listings, withdrawn listings, vacant investment properties.
0 Comments

How to: Calculate Expiry Dates

25/7/2016

0 Comments

 
I'm downloading listings and want to know when they expire, can SalesPartner tell me which listings are 90 days old?
In SalesPartner Reports you could use an expression ​to calculate a listing's theoretical expiry date by adding 90 days to the listed date.
​CALCDATE(Listings.ListDate, 90, 0, 0)
Alternatively you could replace a standard Listings.ExpiryDate field with this argument to show the calculated expiry date only​ when an expiry date is not found. In this example the calculated date is tagged with an asterisk so you can reference the behavior in your report footnotes.
​IF(Listings.ExpiryDate <> '', Listings.ExpiryDate, CALCDATE(Listings.ListDate, 90, 0, 0) + '*')
Picture
Picture
0 Comments

Set up: Vendor Logins for Online Reporting

21/7/2016

0 Comments


How to set up online vendor reporting using VendorOnline

VendorOnline can speed up your vendor reporting. Listing activity is automatically loaded on the vendor's activity webpage. Instead of preparing each vendor's report individually, you can email group notifications each week.
In this lab we'll install VendorOnline on Windows Server 2016 (Preview) in Microsoft Azure. The VendorOnline service can also run on Windows 10.
The vendor online service is installed on a server ​with configured endpoint.
Picture
​Requirements: In SalesPartner > Settings > System File > Register tab > Vendor Online ​must be registered. You can request a vendor online registration code from SalesPartner ​Contact us.
Picture
The Vendor Online registration allows you to allocate ​Vendor Passwords for your listings in ​Listing Entry > Vendor ​tab ​> New Password. ​You must allocate vendor passwords to enable online access.
Picture

Router / endpoint configuration

Configure your Router / ​Network Security settings to allow TCP Port: 8889
In this example we've configured a Network inbound security rule for a Microsoft Azure virtual machine. If your Windows Server is on premise, you can configure your router NAT / Port Forwarding rules - a static IP is strongly recommended.
Picture
Once you've configured your rule, in ​PowerShell use Test-NetConnection [address] -port 8889 ​to remotely test connectivity using either your public IP address or a DNS address (if available).
Test-NetConnection <URL> -port 8889
Picture

Install SynchroServer

On your Windows Server install ​Vendoronlinesetup ​from the SalesPartner Downloads ​webpage. ​​Launch ​VendorOnline Server.
On your Windows Server, install the latest version of SynchroServer which includes SupportServer, SocketServer and SynchroServerConfigurator.
Add SocketServer, SalesNet, VendorOnline and SupportServer to your Start programs. Ensure these services are running in your System Tray.
​Tip: In Windows Server 2016, add shortcuts to (Run) ​shell:common startup
Picture
Open (right click Tray icon) SocketServer > Properties > Connections > uncheck ​Registered Objects Only. ​Restart SocketServer to apply changes.
Picture
Open Control Panel\All Control Panel Items\Windows Firewall > Allow an app or feature through Windows Firewall. Add ​SocketServer and ​VendorOnline ​to Allowed apps and features (Private networks).
On a separate PC connected to a external network from your Server, open your browser and enter your URL/IP address ​including the port.
The Log in screen should be displayed. If the Log in screen does not appear, you may need to troubleshoot the steps above. You should also check your Antivirus exclusions and Firewall. Check for on-screen errors on your VendorOnline host server.
Picture
To log into the portal as a vendor, enter the Listing's reference code (= User ID) in the top field. Enter the system generated Vendor Password ​​into the lower field. Click ​Log in.
​Note: ​The Log in page will show your System File > Company Name and Salesperson Name as the ​Registered to identity.

Create a VendorOnline Email Template

Copy your VendorOnline Portal address URL.
In SalesPartner open ​Listing Entry > Letters
Select ​CFP to vendor - login.rtf > ​click ​Edit.
Picture
Delete ​the [INSERT LINK] ​text.
With your cursor focused in the empty space, click ​Insert > Hyperlink. ​The link lets the vendor click through to their log-in page from your email.
Paste your VendorOnline portal URL into both hyperlink fields, click OK.
You can edit / modify your template layout and script. Click File > Save > ​and give your template a new name. Note: ​CFP* ​templates are updated periodically, so save your template with a unique name to preserve your changes.
Picture
The template includes several useful merge fields.
<VendorGreeting> - Merge the vendor's first name into email
<ListingsStNoStreet> - Merge the listing's street address
<ListingsRef> - Merge the listing's reference code. This is the vendor's User ID ​for the Portal
<VendorPassword> - Merge the vendor's password
​​Open your Letter to verify the merge fields and Hyperlink are working correctly. To send a test to yourself, edit the vendor's address or create a listing for testing purposes and load your own contact information in vendor details.
Picture

VendorOnline

The online vendor report will show your Company logo (as installed in SalesPartner) and your company name (System File).
The Listing Agent's ​photo and contact details are displayed (sourced from SalesPartner).
All activity types including uncompleted are shown by default. Note: Activity ​​​Notes are not published. Activity Names are not published. Activity Description is published.
Picture

Distribution

With VendorOnline, you can deliver your vendor reports quickly.
Open Gallery, ​and ​Select ​your listings
Open Letters, and open your custom ​VendorOnline ​template.
The selected listings will be merged into a stack of personalized emails. Note the counter in the left corner.
You can add general market commentary into the body of your email. Your changes will be replicated across all emails in the stack.
Click ​Email All to enter your subject and click ​Send
Picture

Notes:

VendorOnline can be hosted on-premise providing a persistent always-on Windows PC is available (such as a desktop). Your router must support NAT rules. Your IP address should be fixed/static.
VendorOnline is not available for SP-Cloud subscriptions with less than 5 seats.
VendorOnline is suitable for Hybrid-Cloud and Cloud-only (min 5 seat) environments.
0 Comments

Troubleshooting: Stack Overflow errors

12/7/2016

0 Comments

 
A common cause behind Stack Overflow errors which occur in OfficePartner is where a user has maximized a screen that does not support maximization, and these settings have been written to the user's rezyOffice.screen.ini file in AppData. To correct the INI file, open ​Explorer > %AppData% > rezyOffice.screen.ini ​using Notepad (or open rezy.screen.ini for SalesPartner, however SalesPartner is much more resilient to these scenarios).
Picture
In this particular case, the ​Trust Account Bank ReconciliationIsMax ​screen had been inadvertently saved as =1 (maximized). To resolve the error, we changed this entry to ​Trust Account Bank ReconciliationIsMax=0.
0 Comments
<<Previous
    AnyDesk Windows Link
    AnyDesk Mac Link
    Log in

    Admin
    Geoff Duncan

    Archives

    June 2022
    October 2021
    September 2021
    August 2021
    July 2021
    June 2021
    May 2021
    April 2021
    March 2021
    February 2021
    January 2021
    December 2020
    November 2020
    October 2020
    September 2020
    August 2020
    July 2020
    June 2020
    May 2020
    April 2020
    March 2020
    February 2020
    January 2020
    December 2019
    November 2019
    October 2019
    September 2019
    August 2019
    July 2019
    June 2019
    May 2019
    April 2019
    March 2019
    February 2019
    January 2019
    December 2018
    November 2018
    October 2018
    September 2018
    August 2018
    July 2018
    June 2018
    May 2018
    April 2018
    March 2018
    February 2018
    January 2018
    December 2017
    November 2017
    October 2017
    September 2017
    August 2017
    July 2017
    June 2017
    May 2017
    April 2017
    March 2017
    February 2017
    January 2017
    December 2016
    November 2016
    October 2016
    September 2016
    August 2016
    July 2016
    June 2016
    May 2016
    April 2016
    March 2016
    February 2016
    January 2016
    December 2015
    November 2015
    October 2015
    September 2015
    August 2015
    July 2015
    June 2015
    May 2015
    April 2015
    March 2015
    February 2015
    January 2015
    December 2014
    November 2014
    October 2014
    September 2014
    August 2014
    July 2014
    June 2014
    May 2014
    April 2014
    March 2014
    February 2014
    January 2014
    December 2013
    November 2013
    October 2013
    September 2013
    August 2013

    Categories

    All

    RSS Feed

Picture
"SalesPartner helps me extract maximum value from my
biggest asset - my database".

Andrew Duncan
www.agentmonday.com


Picture
Developed in Wellington, New Zealand
SalesPartner Software - established in 1993
Leading-edge software for real estate salespeople