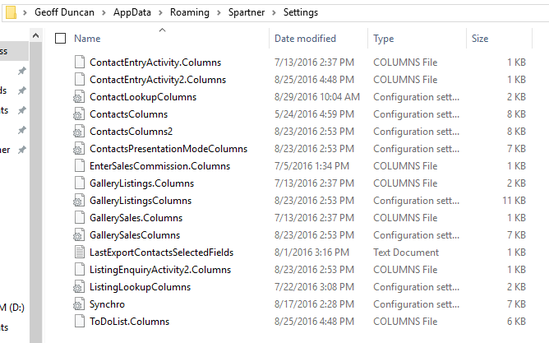
AppData is a hidden Windows folder located in C:\Users\YourUsername\AppData\. Several SalesPartner settings files are stored in AppData\Roaming\Spartner\Settings. It can be useful to know where these settings are stored when replicating an installation, or if you wish to copy various settings onto another PC (AppData settings are not shared). To open AppData, Press Windows+R (to open the Windows Run Command). Type %AppData%, and click OK Navigate into Spartner Settings and review available configuration files. The number of files varies depending on which settings are unique (have been personalized). Note the Synchro INI file which allows you to copy SynchroServer settings. When copying configuration files, ensure that SalesPartner is closed on both machines. Use a USB drive to transfer desired files from one machine to another. Place copied files in the appropriate destination folder on the target PC. Use AppData to copy your customized SalesPartner screen layouts (Gallery, Contacts, To-Do List) and Synchronization settings / preferences, when you are upgrading or replacing your PC or adding another workstation to your network.
0 Comments
Using Alias Changer, you can launch SalesPartner as either a networked or independent application. This may be useful if you wish to access SalesPartner data on your Local Network while you are in the office, as well as a local copy when you are off site. Scenario 1: An office team of salespeople and administrators want to access a shared database in their office, hosted on premise (non-Cloud). Scenario 2: A sales team leader operates as a salesperson as well as an administrator. They require access to central data, as well as their own local database. Scenario 3: A collaborative office wants to delegate certain admin roles to trusted team members. Notes: Privilege and access rights are determined at an administrative level. Agent policy is configured individually, and passwords are required by default for the scenarios listed above. Requirements: The central SalesPartner database must be network accessible. Client and Server instances must be running SalesPartner version 11 or higher. Windows 10 is recommended and supported. Alias Changer is not recommended for Cloud deployments (individual or office). Setup Locate AliasChanger.exe in C:\spartner\ on the client PC, and configure compatibility settings to Run as: Administrator. On the client PC, create a Desktop Shortcut for AliasChanger.exe, from C:\spartner\ named SalesPartner Office Create a second desktop shortcut named SalesPartner Local. Right click on the Desktop shortcut for SalesPartner Office Alias Changer, open the shortcut tab, to edit the Target path. Enter the network Data location. For example, if the office data resides in \\LEOPARD\, enter "C:\spartner\AliasChanger.exe \\LEOPARD\spartner\data\" Edit the Target path for SalesPartner Local AliasChanger shortcut: "C:\spartner\AliasChanger.exe C:\spartner\data" Note: If User Account Control UAC is enabled on the device, you'll be prompted to allow permission for AliasChanger.exe to run. When executed successfully, the data location will be displayed on screen. You can verify the BDE settings to confirm this in C:\Program Files (x86)\Common Files\Borland Shared\BDE BDEADMIN > Databases > Rezy, and Configuration > Drivers > Native > Paradox > NET DIR path. To switch back to local data, close SalesPartner and run the SalesPartner Local AliasChanger desktop shortcut. Limitations: The INI Settings on the client instance are not switched when using AliasChanger.exe. Therefore local folders are used in both LAN and local environments for: Reports, Letters, Pics1. Client PCs should be synchronized regularly (in local mode) to ensure that Pics1 folders are consistent. Reports and Letters can also be synchronized as required. INI Settings are configured locally, allowing individuals to specify unique email 'from' address and personal UI preferences. Objectives: Provide solutions for elevated agent user access. Enable agents to enter/update office activity. Enable (where permitted through policy settings) modification of contacts and/or listing information.
You can quickly speed up Windows 10 by turning off Background Apps. Open Settings (Windows key + i) Click Privacy Scroll down and open Background apps. Switch off any apps you do not need to run in the background. Leave specific apps running if you want their notifications to appear, if you use Messenger for example. Restart your PC to ensure that only your required background apps are running.
In SalesPartner > Contact Entry > Looking for tab > Locations: You can customize the Locations options and assign location preferences for buyers. Note that a buyer can only have one location assigned as their preference, so the best approach is to create areas which apply to your region. Some examples include: - Grammar school zone - Premium suburbs - Lifestyle / Rural - High density - Eastern Suburbs To customize the Locations list, open SalesPartner > More > Settings > Buyer Locations Click on the lowest table item, and use Down Arrow to create a new blank item. Type the location name, then click on another existing item to lock in the table changes. Restart SalesPartner to apply changes. Tip: Use Ctrl+Delete to delete an existing Location option. In Contacts, you can filter contacts by Location.
SalesPartner can locate and save geo-coordinates for your listings. Latitude an longitude coordinates are included in the Listings Synchronizer application (latest version) which is used to feed company websites. Follow the steps below to fetch coordinates for SalesPartner listings: Open SalesPartner > Gallery Select listings. Click Tools > Show on Map The selected listings will be displayed in Map view once processing is complete. Double click into a listing (open Listing Entry) to review the coordinates in the Map tab. You can also add coordinates to an individual listing via Listing Entry > Map tab. Use the Map Pin tool to fetch coordinates The geo-coordinates will be included in the Listings.XML file which is published by ListingsSynchronizer.
|
Admin
|