How to set up online vendor reporting using VendorOnline
VendorOnline can speed up your vendor reporting. Listing activity is automatically loaded on the vendor's activity webpage. Instead of preparing each vendor's report individually, you can email group notifications each week.
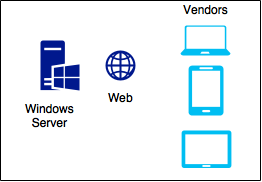
In this lab we'll install VendorOnline on Windows Server 2016 (Preview) in Microsoft Azure. The VendorOnline service can also run on Windows 10.
The vendor online service is installed on a server with configured endpoint.
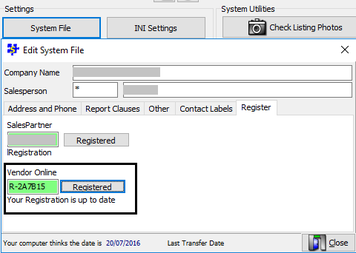
Requirements: In SalesPartner > Settings > System File > Register tab > Vendor Online must be registered. You can request a vendor online registration code from SalesPartner Contact us.
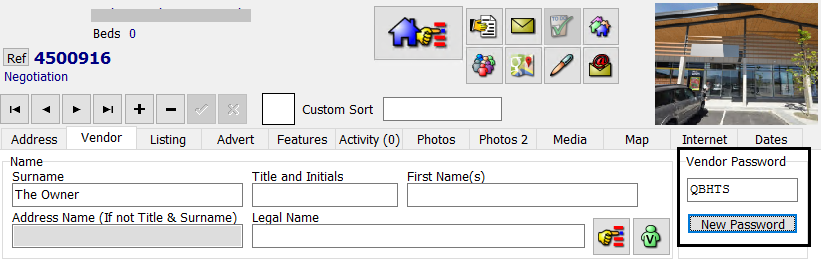
The Vendor Online registration allows you to allocate Vendor Passwords for your listings in Listing Entry > Vendor tab > New Password. You must allocate vendor passwords to enable online access.
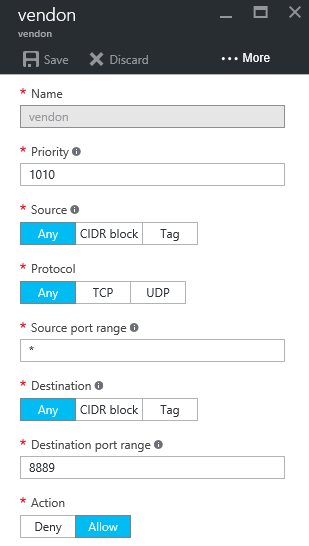
Router / endpoint configuration
Configure your Router / Network Security settings to allow TCP Port: 8889
In this example we've configured a Network inbound security rule for a Microsoft Azure virtual machine. If your Windows Server is on premise, you can configure your router NAT / Port Forwarding rules - a static IP is strongly recommended.
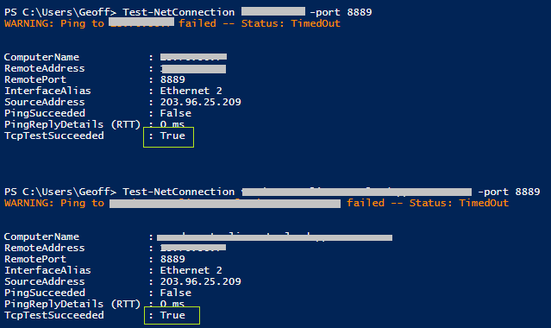
Once you've configured your rule, in PowerShell use Test-NetConnection [address] -port 8889 to remotely test connectivity using either your public IP address or a DNS address (if available).
Test-NetConnection <URL> -port 8889
Install SynchroServer
On your Windows Server install Vendoronlinesetup from the SalesPartner Downloads webpage. Launch VendorOnline Server.
On your Windows Server, install the latest version of SynchroServer which includes SupportServer, SocketServer and SynchroServerConfigurator.
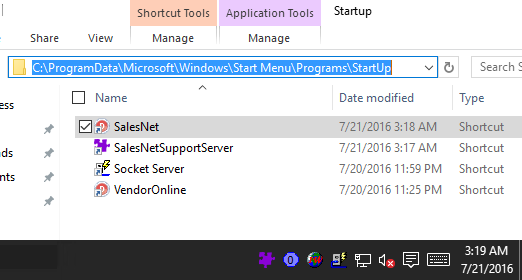
Add SocketServer, SalesNet, VendorOnline and SupportServer to your Start programs. Ensure these services are running in your System Tray.
Tip: In Windows Server 2016, add shortcuts to (Run) shell:common startup
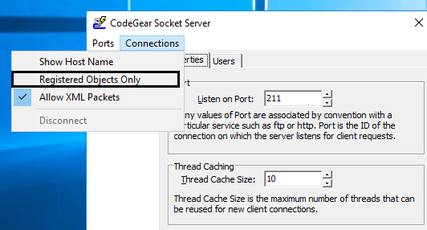
Open (right click Tray icon) SocketServer > Properties > Connections > uncheck Registered Objects Only. Restart SocketServer to apply changes.
Open Control Panel\All Control Panel Items\Windows Firewall > Allow an app or feature through Windows Firewall. Add SocketServer and VendorOnline to Allowed apps and features (Private networks).
On a separate PC connected to a external network from your Server, open your browser and enter your URL/IP address including the port.
The Log in screen should be displayed. If the Log in screen does not appear, you may need to troubleshoot the steps above. You should also check your Antivirus exclusions and Firewall. Check for on-screen errors on your VendorOnline host server.
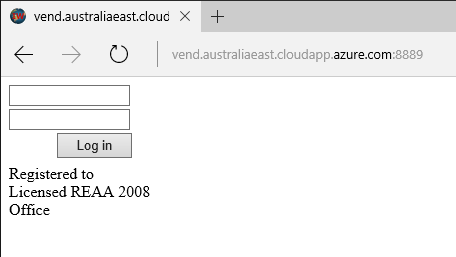
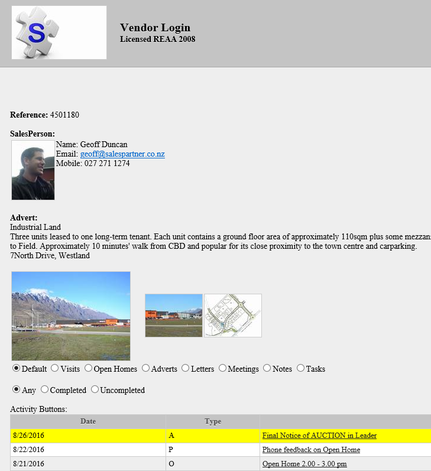
To log into the portal as a vendor, enter the Listing's reference code (= User ID) in the top field. Enter the system generated Vendor Password into the lower field. Click Log in.
Note: The Log in page will show your System File > Company Name and Salesperson Name as the Registered to identity.
Create a VendorOnline Email Template
Copy your VendorOnline Portal address URL.
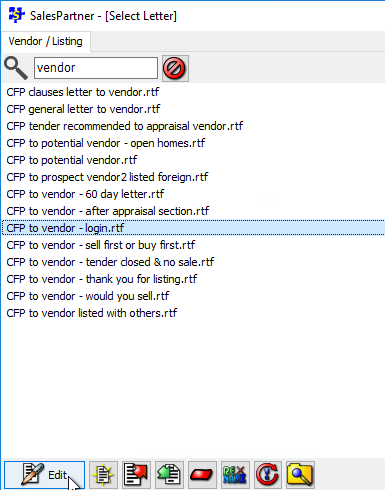
In SalesPartner open Listing Entry > Letters
Select CFP to vendor - login.rtf > click Edit.
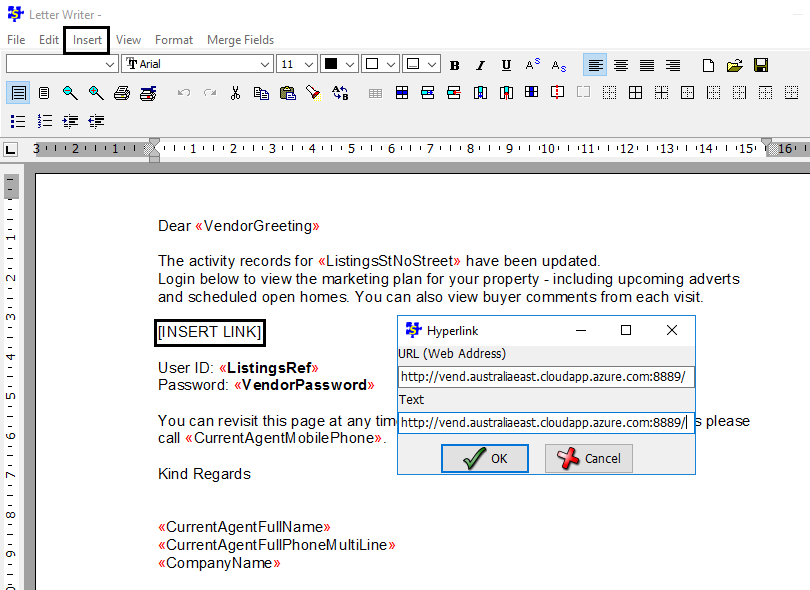
Delete the [INSERT LINK] text.
With your cursor focused in the empty space, click Insert > Hyperlink. The link lets the vendor click through to their log-in page from your email.
Paste your VendorOnline portal URL into both hyperlink fields, click OK.
You can edit / modify your template layout and script. Click File > Save > and give your template a new name. Note: CFP* templates are updated periodically, so save your template with a unique name to preserve your changes.
The template includes several useful merge fields.
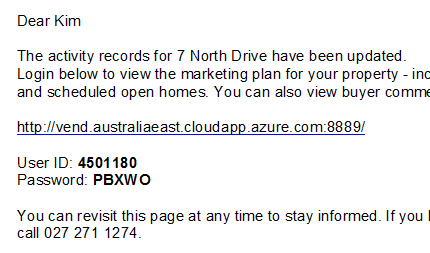
<VendorGreeting> - Merge the vendor's first name into email
<ListingsStNoStreet> - Merge the listing's street address
<ListingsRef> - Merge the listing's reference code. This is the vendor's User ID for the Portal
<VendorPassword> - Merge the vendor's password
Open your Letter to verify the merge fields and Hyperlink are working correctly. To send a test to yourself, edit the vendor's address or create a listing for testing purposes and load your own contact information in vendor details.
VendorOnline
The online vendor report will show your Company logo (as installed in SalesPartner) and your company name (System File).
The Listing Agent's photo and contact details are displayed (sourced from SalesPartner).
All activity types including uncompleted are shown by default. Note: Activity Notes are not published. Activity Names are not published. Activity Description is published.
Distribution
With VendorOnline, you can deliver your vendor reports quickly.
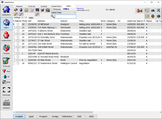
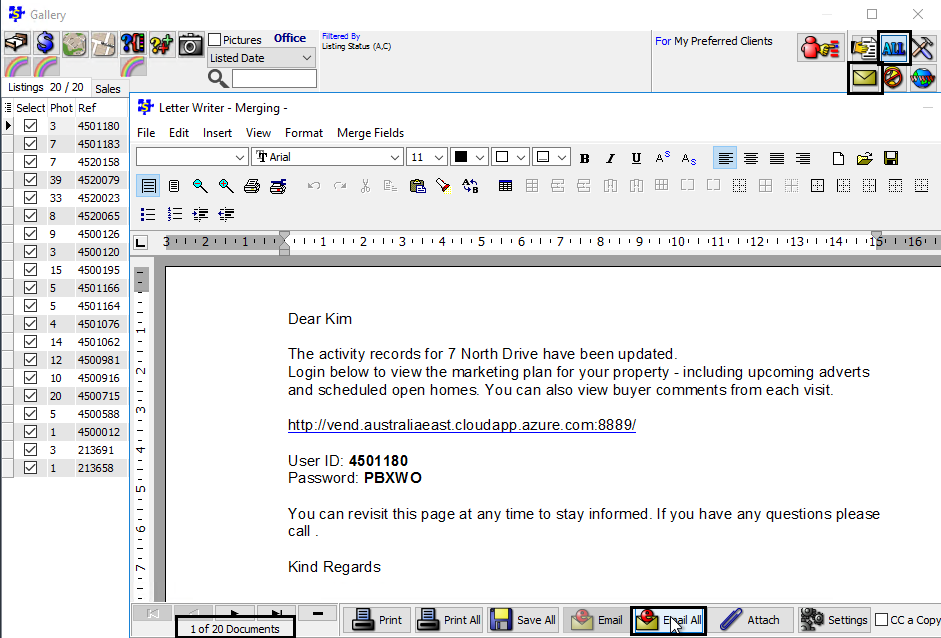
Open Gallery, and Select your listings
Open Letters, and open your custom VendorOnline template.
The selected listings will be merged into a stack of personalized emails. Note the counter in the left corner.
You can add general market commentary into the body of your email. Your changes will be replicated across all emails in the stack.
Click Email All to enter your subject and click Send
Notes:
VendorOnline can be hosted on-premise providing a persistent always-on Windows PC is available (such as a desktop). Your router must support NAT rules. Your IP address should be fixed/static.
VendorOnline is not available for SP-Cloud subscriptions with less than 5 seats.
VendorOnline is suitable for Hybrid-Cloud and Cloud-only (min 5 seat) environments.
 RSS Feed